Property Binding In
Angular
§ Before Learning about property binding in angular.it is very important that you understand the difference between an HTML attribute and DOM property.
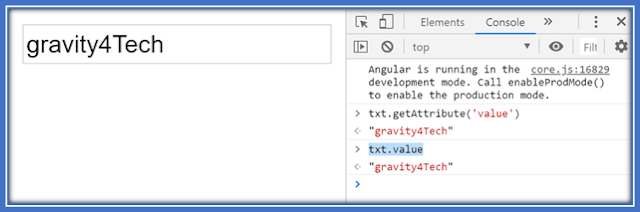
§ Consider an input element value of an input element is equal to gravity4Tech. in the browser we have the input element filled with the string 'gravity4Tech'.

§ If I inspect this element and then in the console type txt.getAttribute('value') represents the textbox element whose id is ‘txt’ which is the input element. txt.getAttribute('value') we can see gravity4Tech.similarly if we type txt.value we can see again gravity4Tech.
§ If
I change the text to GET SET TECH in the input element and then repeat the same
command you can see that getAttribute still returns gravity4Tech but the value
property now returns GET SET TECH.the attribute did not change. but value
property did change.

§ So, in our example the HTML attribute value specified the initial value the DOM property value is the current value so the value attribute remain the same whereas the value property change no why did I explain this explain that because in the code at first glance property binding is going to seem like your binding to the HTML attribute why we are actually binding to the DOM property to avoid that confusion I have to give an example about attributes versus properties with property Binding in angular actually binding to the property of the Dom element.
So it is important to keep in mind that,
§ HTML attributes and the DOM properties are different things.
§ Attributes are defined by HTML and properties are defined by the document object model.
§ Attributes initialized DOM properties and then they are done. attribute values cannot change once they are initialized.
§ Angular binding works with properties and events, and not attributes.
§ The role of attributes is to initialize element properties and their job is done.
§ Why do we need property binding well there is a limitation to interpellation it can only work with string values and there are html properties that are Boolean properties that we may need to sometime bind to?
§ So, let's an example consider the disable attribute of an input element by default it is always set to false so input is always enabling. so, let's add the disabled attribute now if you take a look at the browser, we can see the input element is disabled.

§ Let’s
back in a code now let's try to set this disabled attribute to false so false
and if it takes a look at the browser again you can see that the input is still
disabled this is a problem with Boolean attribute such as disable.
§ When
you add the disabled attribute, it presents alone initializes the input
disabled to true the input is disabled setting the value to false has no effect
and because it is a Boolean attribute that need true or false interpellation
doesn't work.
§ So, interpellation doesn’t work for Boolean attribute. so if I even set to this false within curly braces at back to the browser the input still disabled.
§ So
the solution here is to use property binding so instead of using the double curly
braces which does not work will going to enclose disabled within square bracket
and then assign it is true or false so now that we have set to false it means
the input is not disable and if we go back to the browser you can see the input element are enabled I can type
anything I want to.

§ Now we keep to set disabled to true then you can see the input element is now disabled.

§ of course, hardcoding true or false is not of much use. so, let's create a property in the class and then bind it.
§ so now we add a new property w call this public isDisabled and set it true.
§ Now instead of Binding it to a true or false value we binded it to the isDisabled property right now isDisabled is set to true in the browser the input element is still disabled go back to the code set isdisabled to false and go back in the browser the input element is not disabled anymore.
app.component.ts
app.component.html
[html-element-property-name] ="component property-name"
<input type="text"
value="gravity4Tech" id="txt"
[disabled]="isDisable"/>
v When working with the style attribute, the binding method switches up a bit, you bind directly to the style property involved. If you wanted to update the color of an element, the following syntax would be used:
app.component.ts
app.component.html

Author Name
Author Description!


Post a Comment